Finally this macrame lawn chair tutorial is done! For those of you who have been waiting for it, I promise your patience will be rewarded once your chair is finished and you’re toting it to the next outdoor concert – having to continuously stop along the way to rake in all the oohs and ahhs.
(This post may contain affiliate links; as an Amazon associate I earn from qualifying purchases. See disclosure here.)
supplies needed
- one metal lawn chair in need of a face-lift (or you can order a new chair frame)
- 200 yards of 6mm craft cord
- two size 19/Q plastic crochet hooks
- lighter
- scissors
step 1 – prep the chair
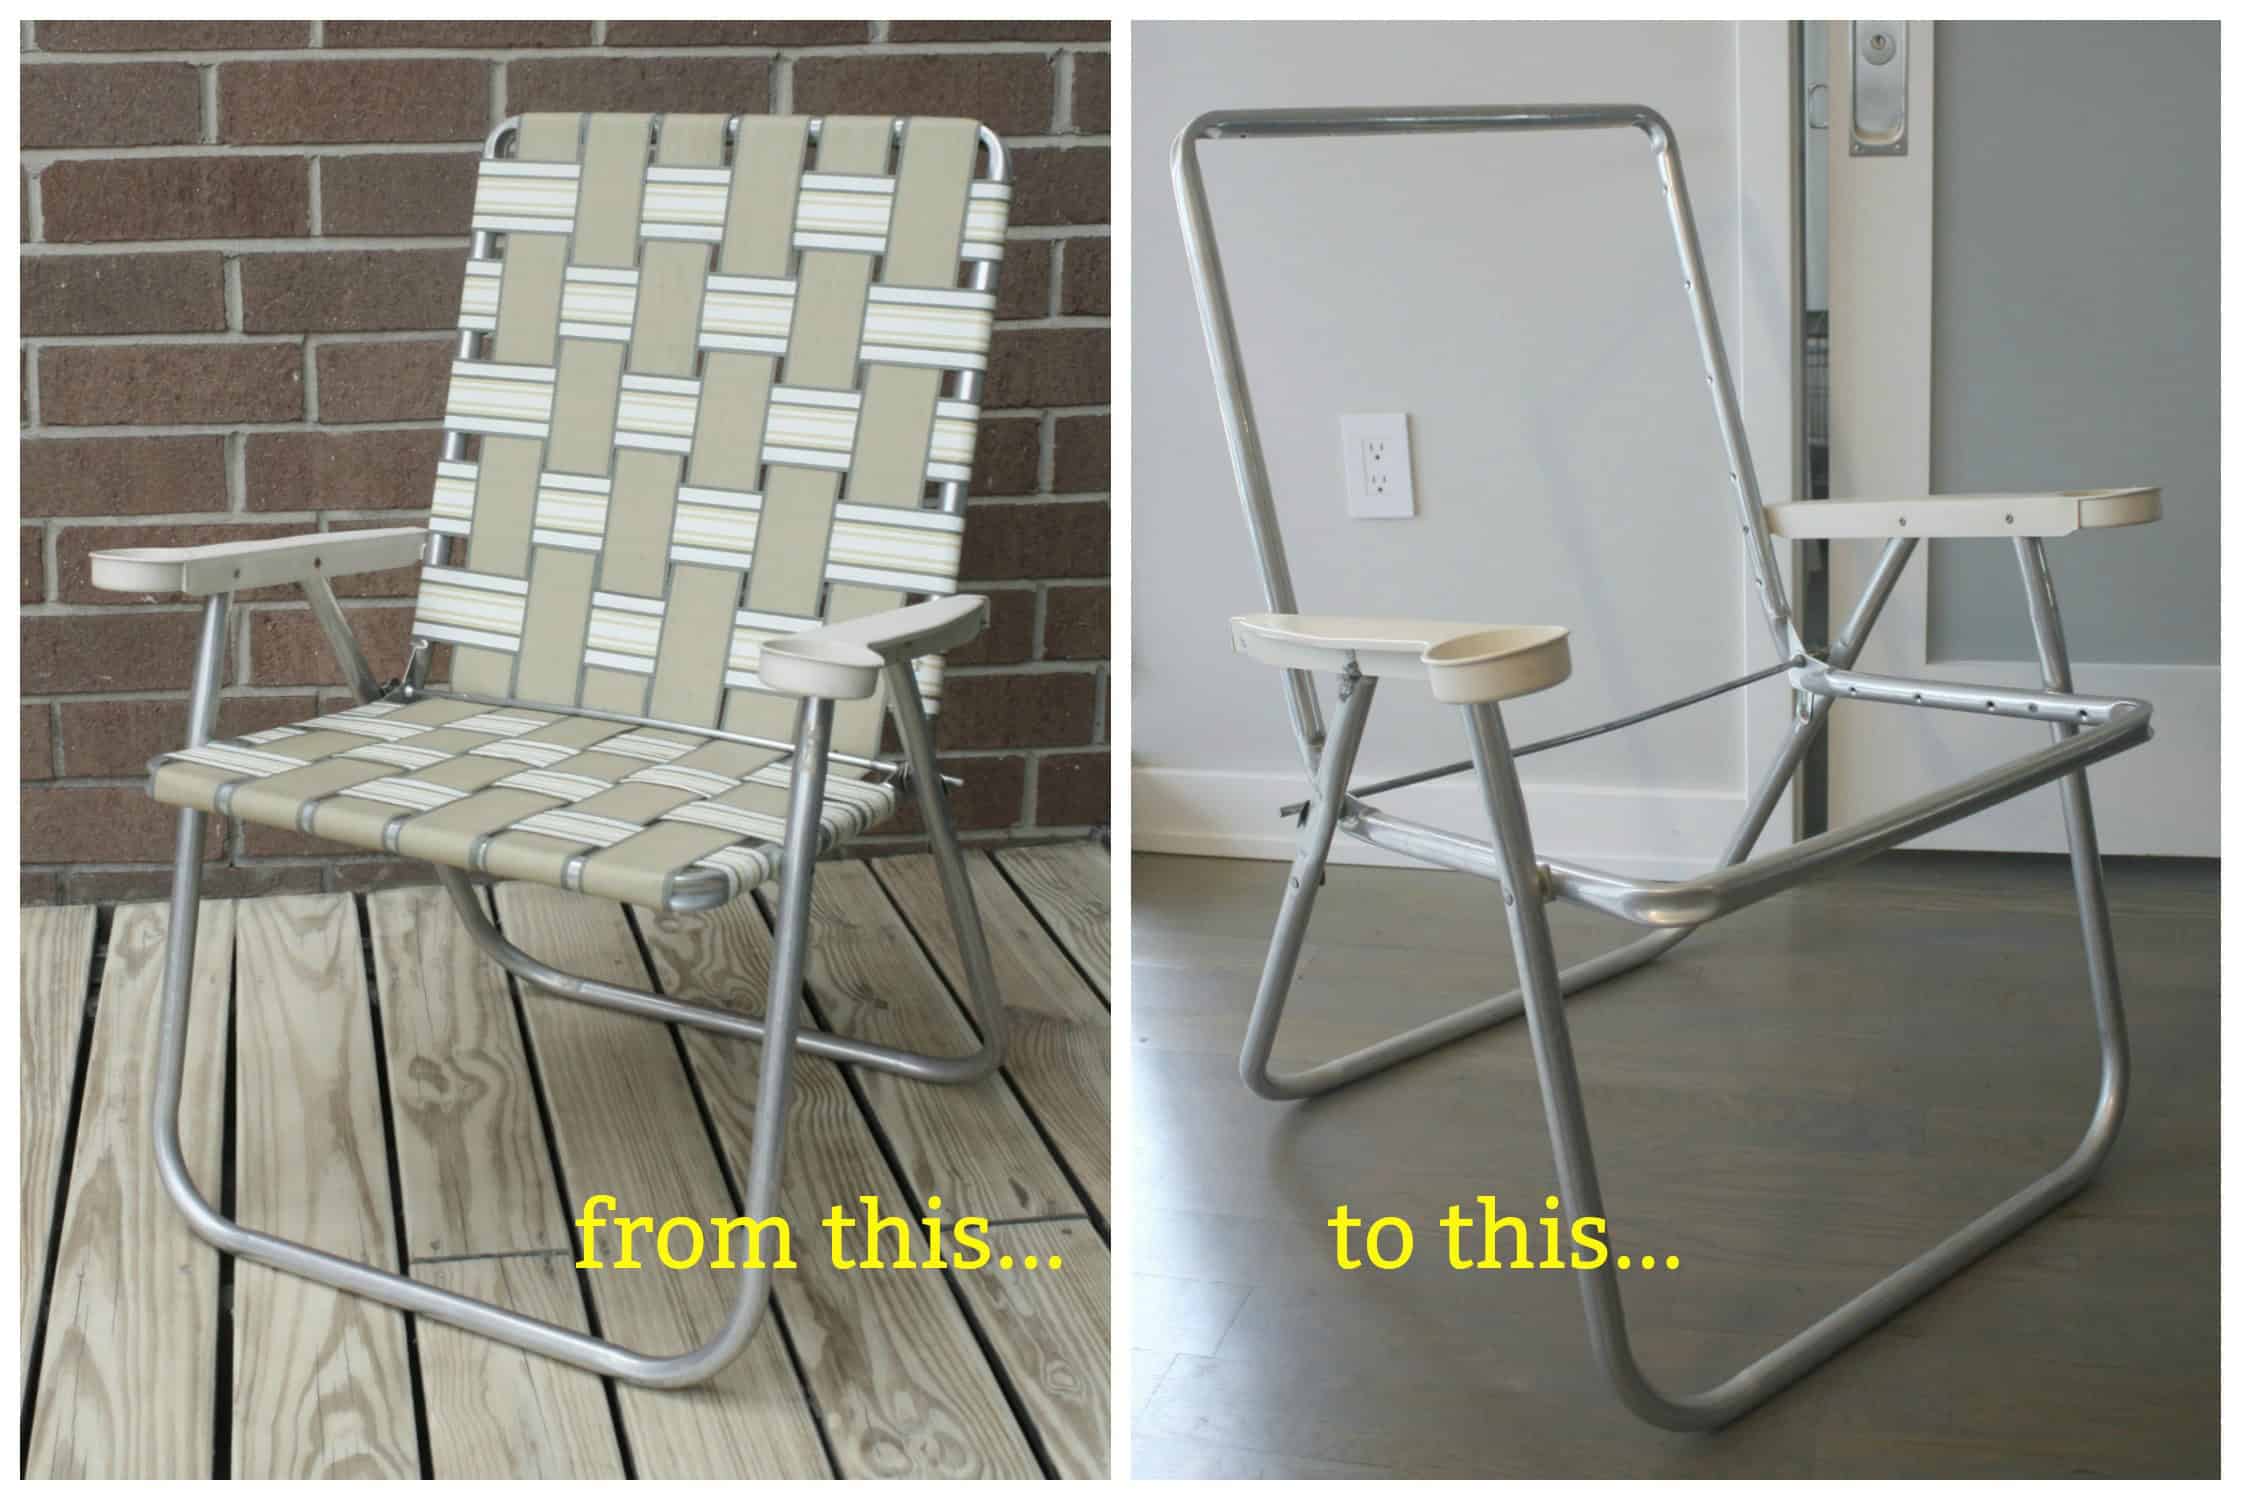
If you are using an old chair, remove the webbing and clean the chair well. For my first chair, I upcycled a vintage lawn chair, and it was fun to see the transformation!

step 2 – getting started
To begin with the vertical weave, place your roll of cording on the floor beneath the chair (& keep it here during the entire weaving process.) Tie a double knot onto the left end of the front bottom bar.
Pull the cording back & under the fold bar, then up to the top back rim of the chair.
**Remember, you will always go under the “fold bar” and always over the top back bar & the bottom front bar.
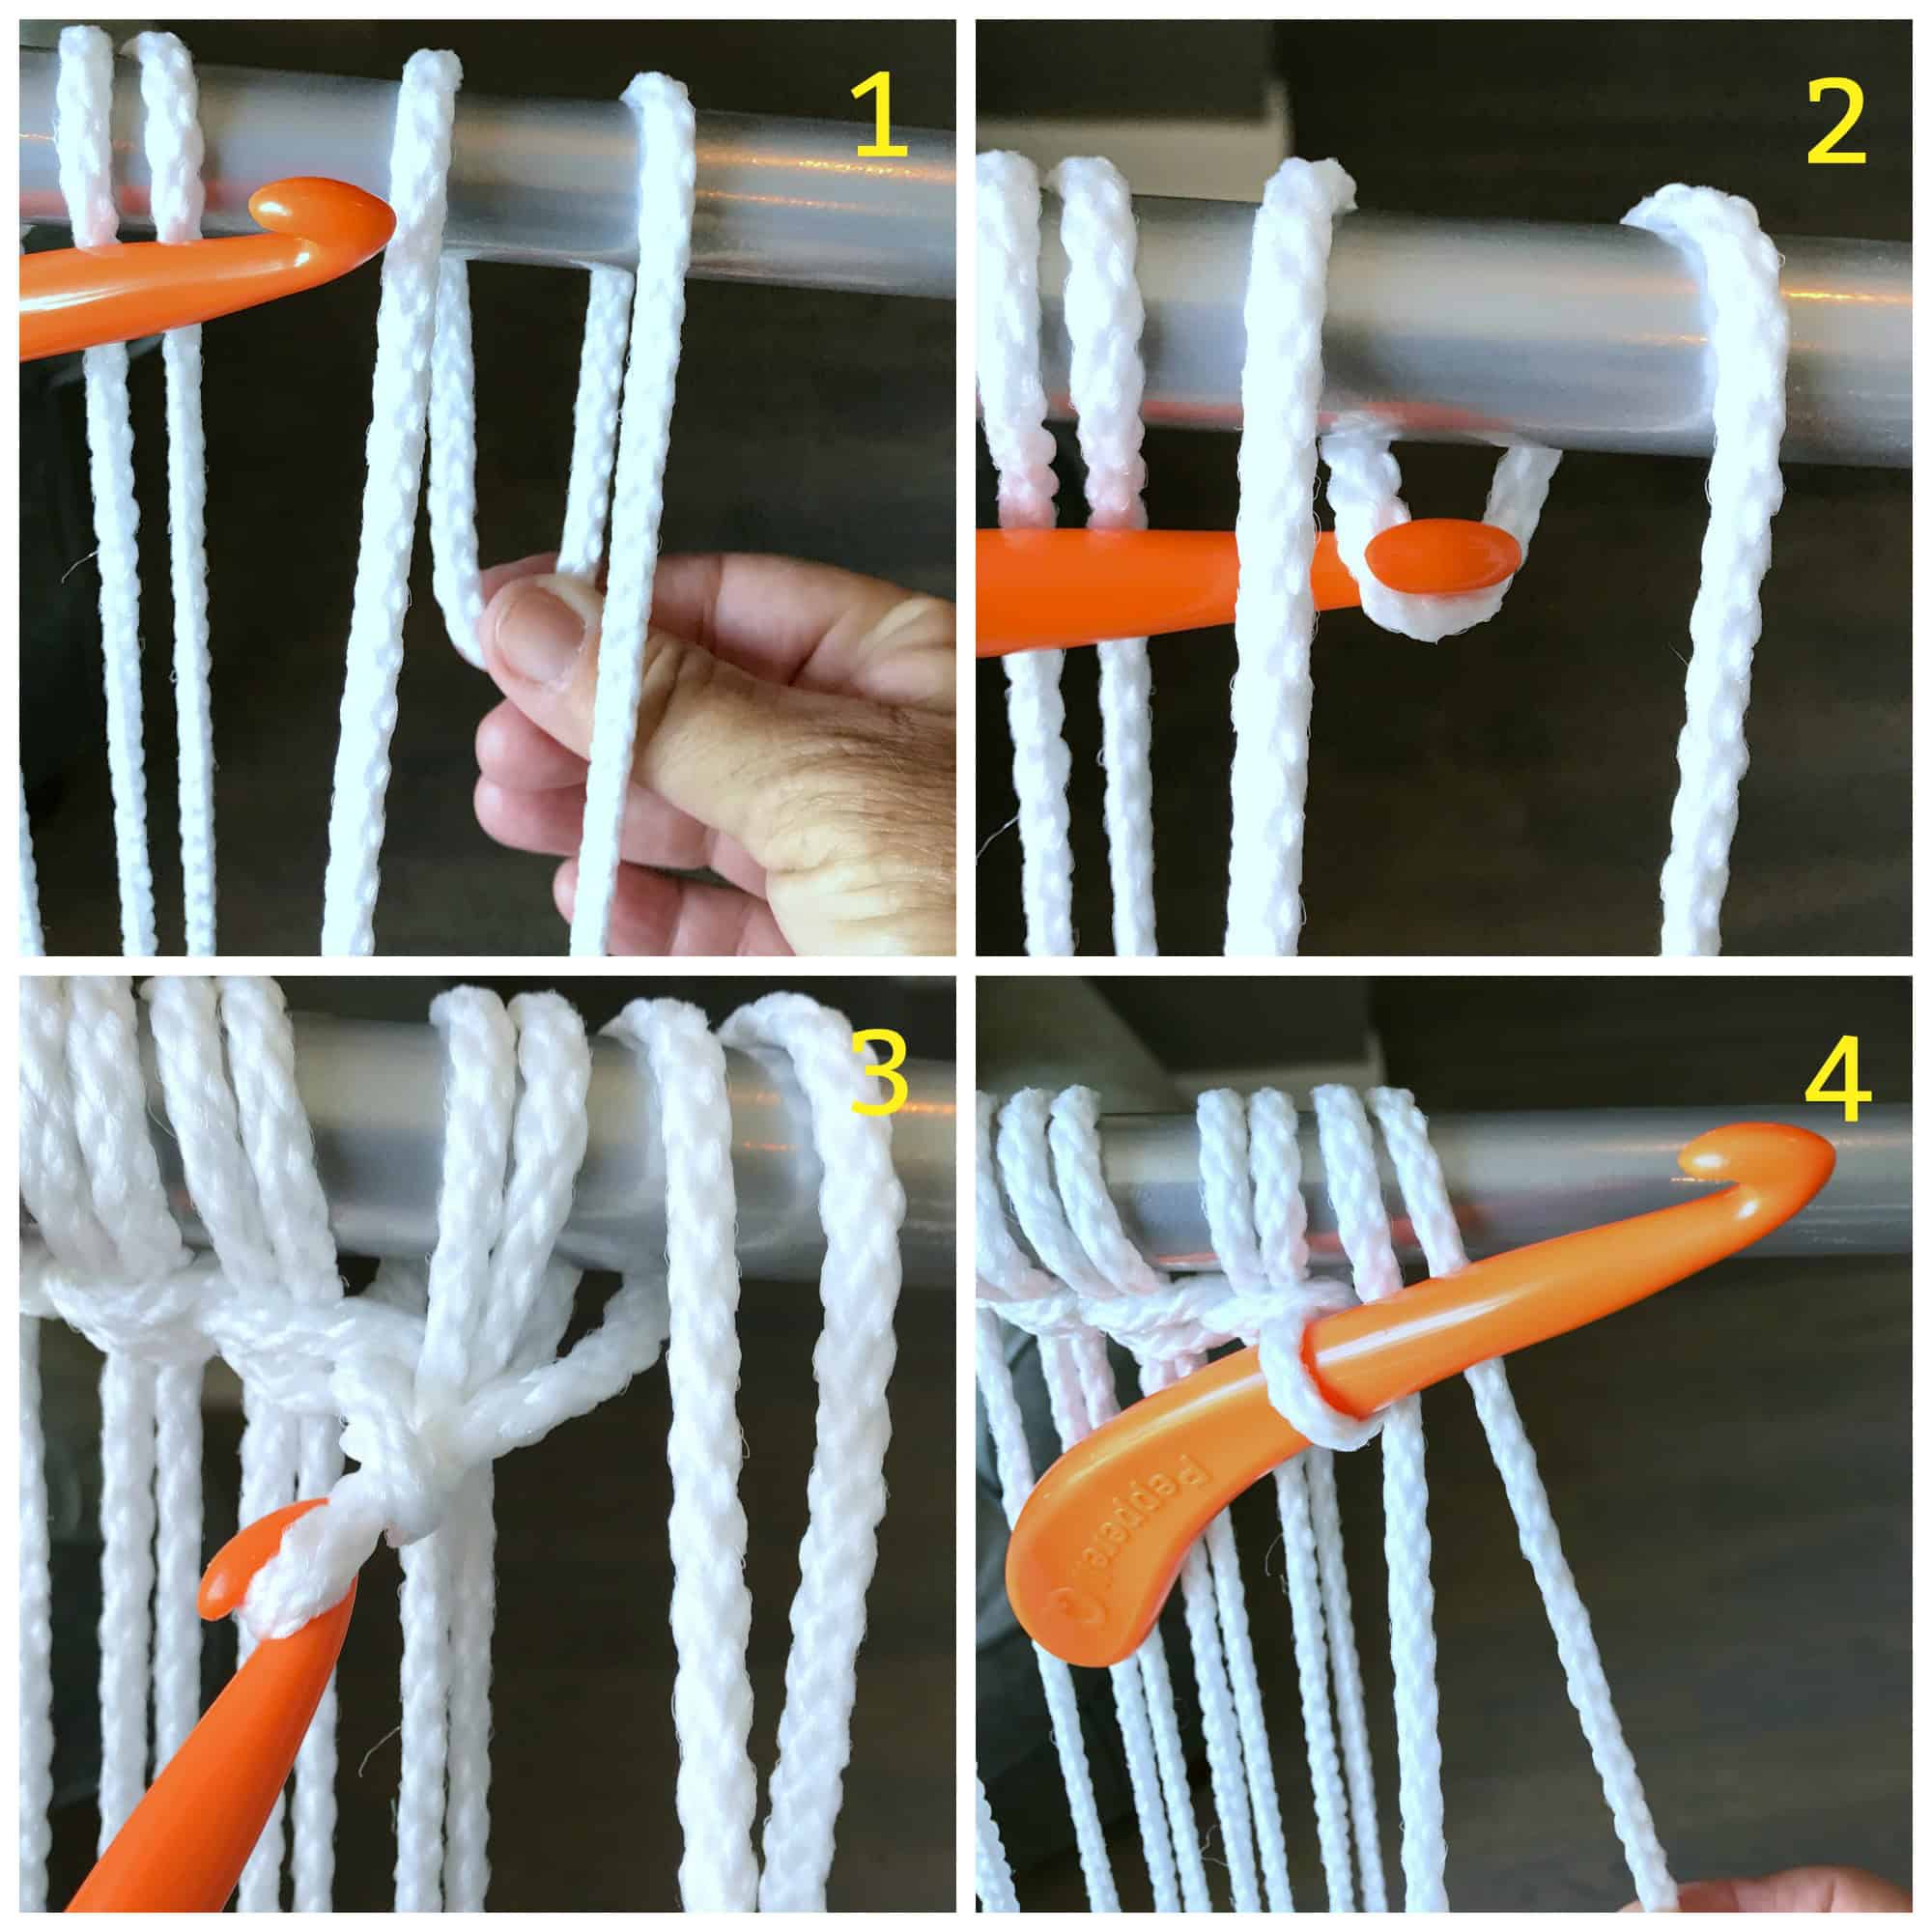
(1) Pull the cording over the top back bar, (2) then down behind it, creating a “U” loop. (3) Insert one crochet hook into the “U.” (4) Tighten by pulling the loose end of the rope. As it tightens, the crochet hook will act as a “placeholder.”
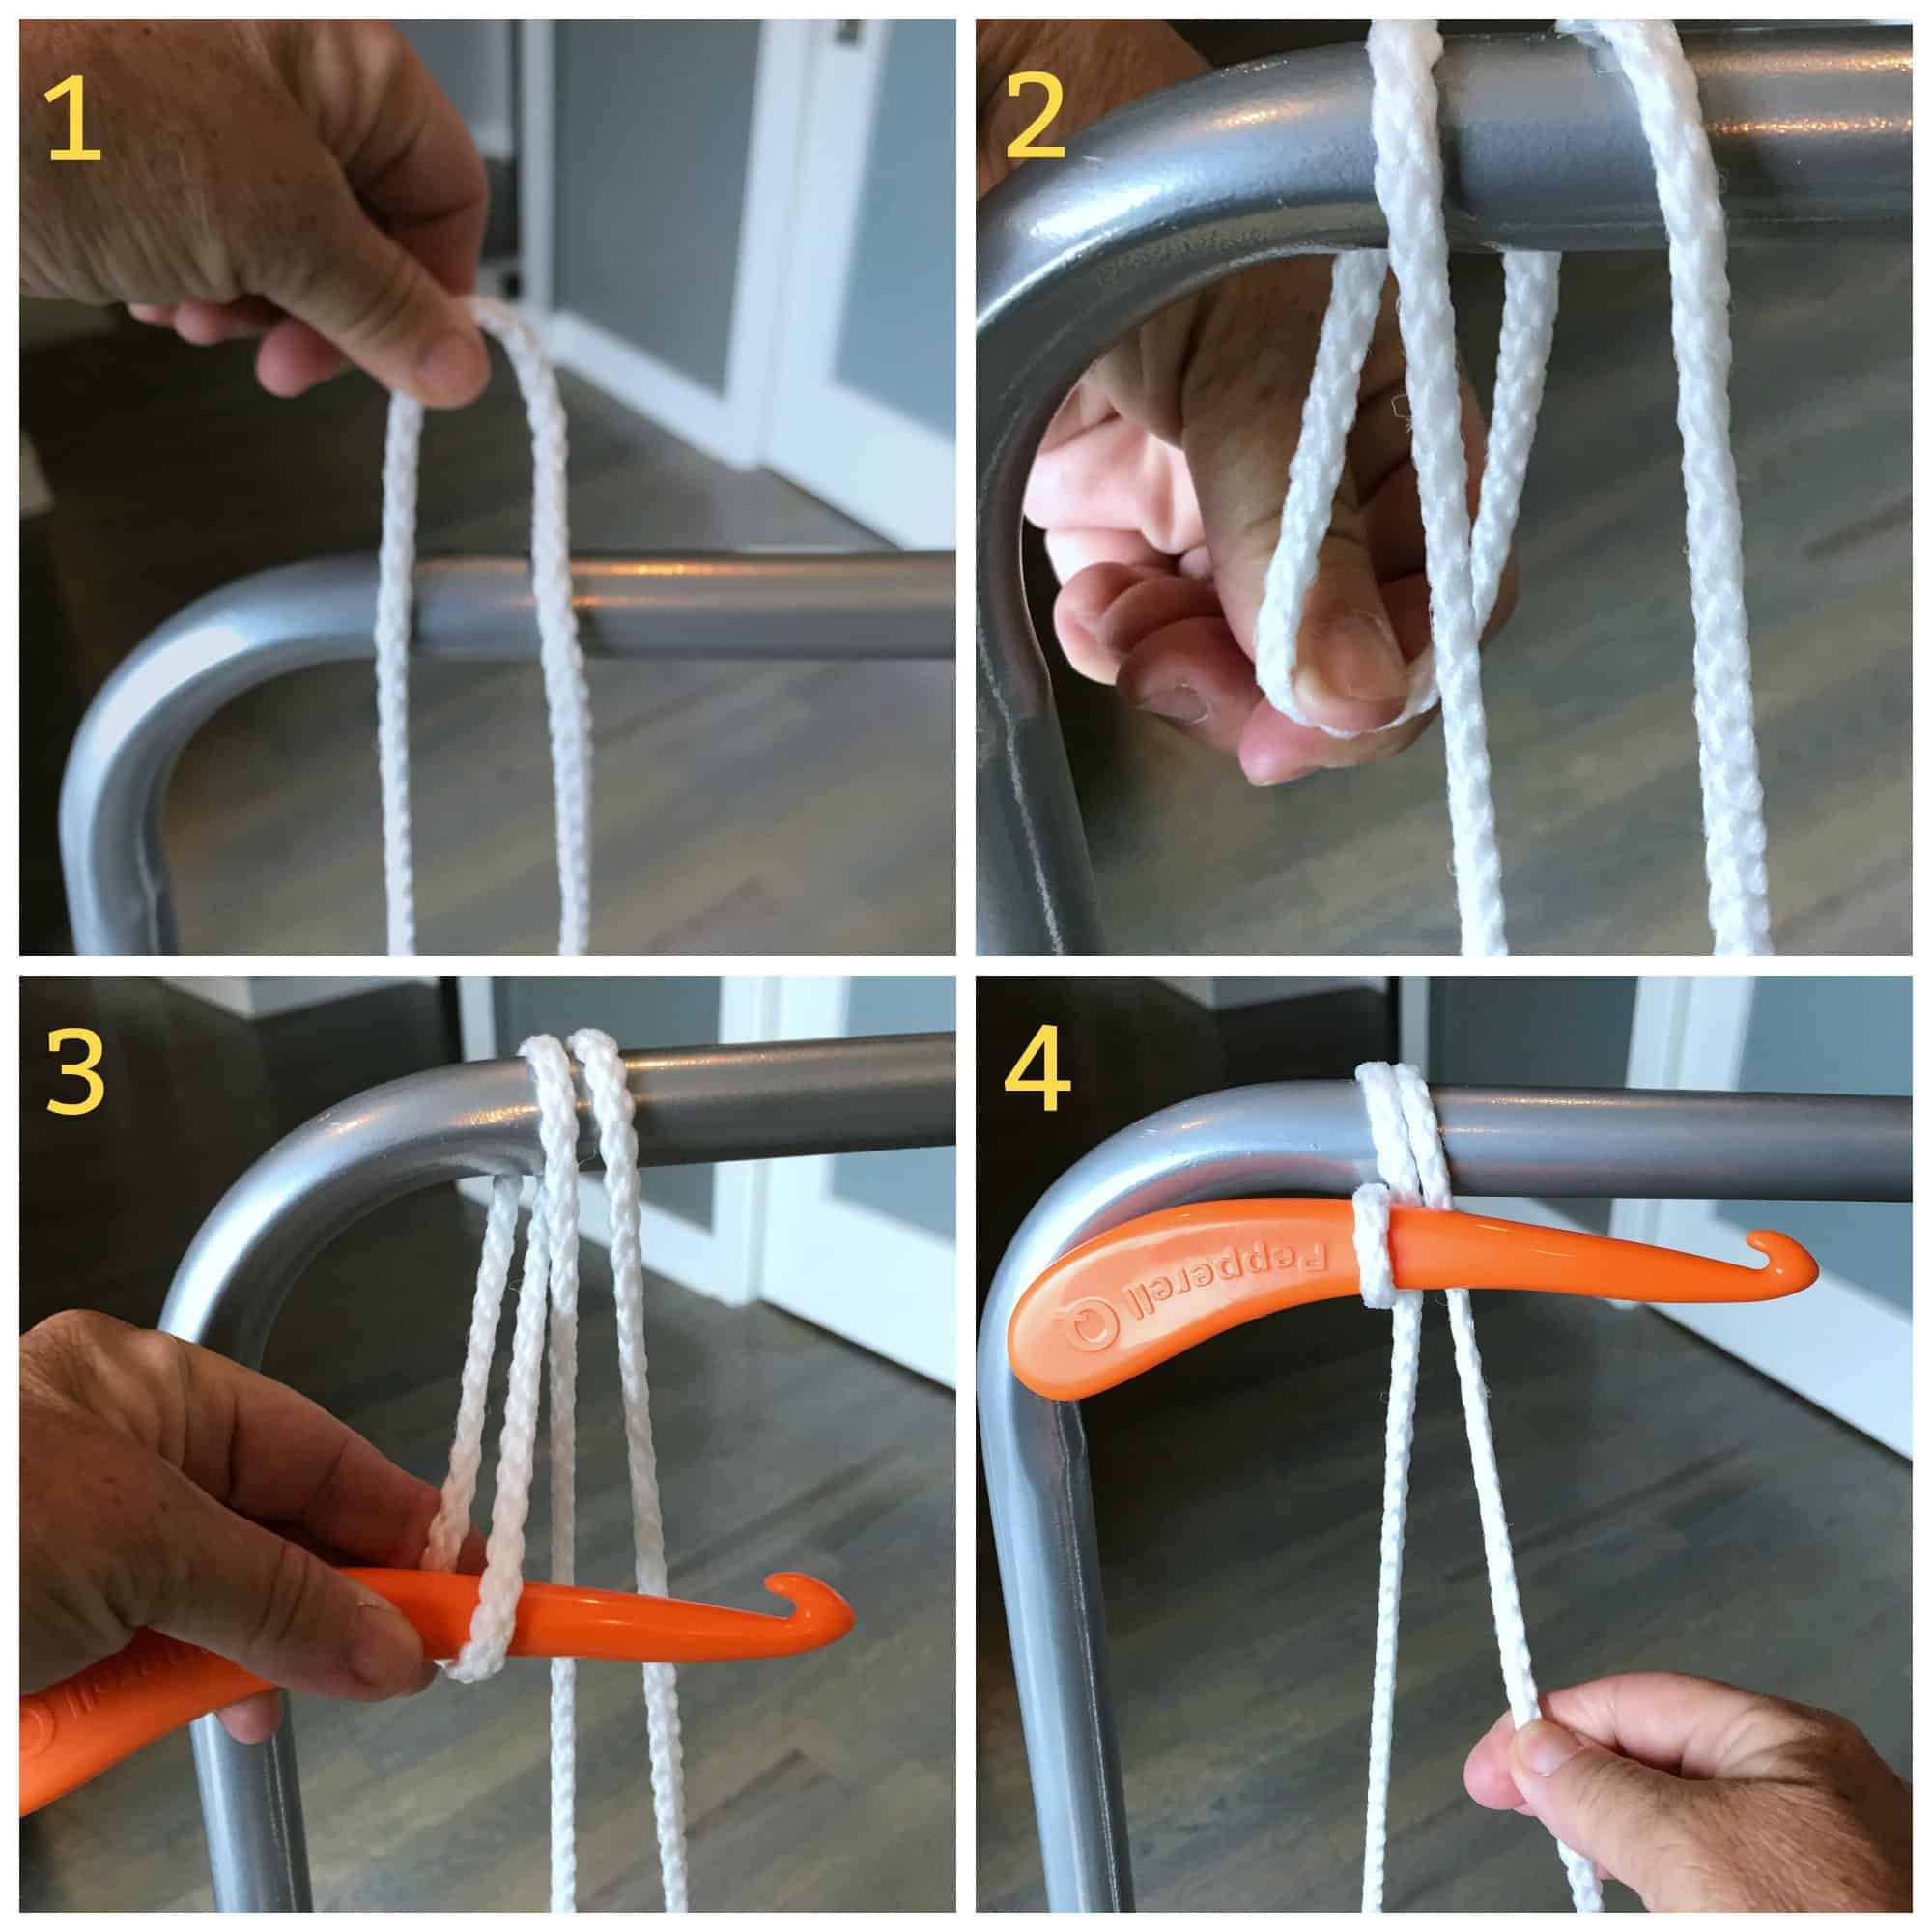 Next, you will pull the loose cord back down and under the fold bar, (1) then over the front bottom bar. (2) Create a “U” loop. (3) Insert the second crochet hook through the “U” and tighten rope to create another “placeholder.” This is the same procedure as you used for the top bar.
You can also view my video tutorial for this step.
step 3 – chain stitch
From this point on, you will be using the chain stitch to continue with the vertical weaving. You can view my video tutorial to learn the chain stitch; I have also provided a photo tutorial below.
(1) Pull the cording over the top back bar, and pull a “U” loop down behind it. (2) With the crochet hook still acting as a placeholder, grab the “U.” (3) Pull the “U” loop back through the current loop holding the crochet hook. (4) Now tighten the cord, so the crochet hook once again becomes a placeholder. Only now the hook has moved a bit to the right, thus creating a chain stitch.
Now continue this process for the lower front bar, then back under the fold bar and to the upper back bar. Continue making chain stitches in this fashion until all the vertical weaving is complete.
step 4 – finishing ends
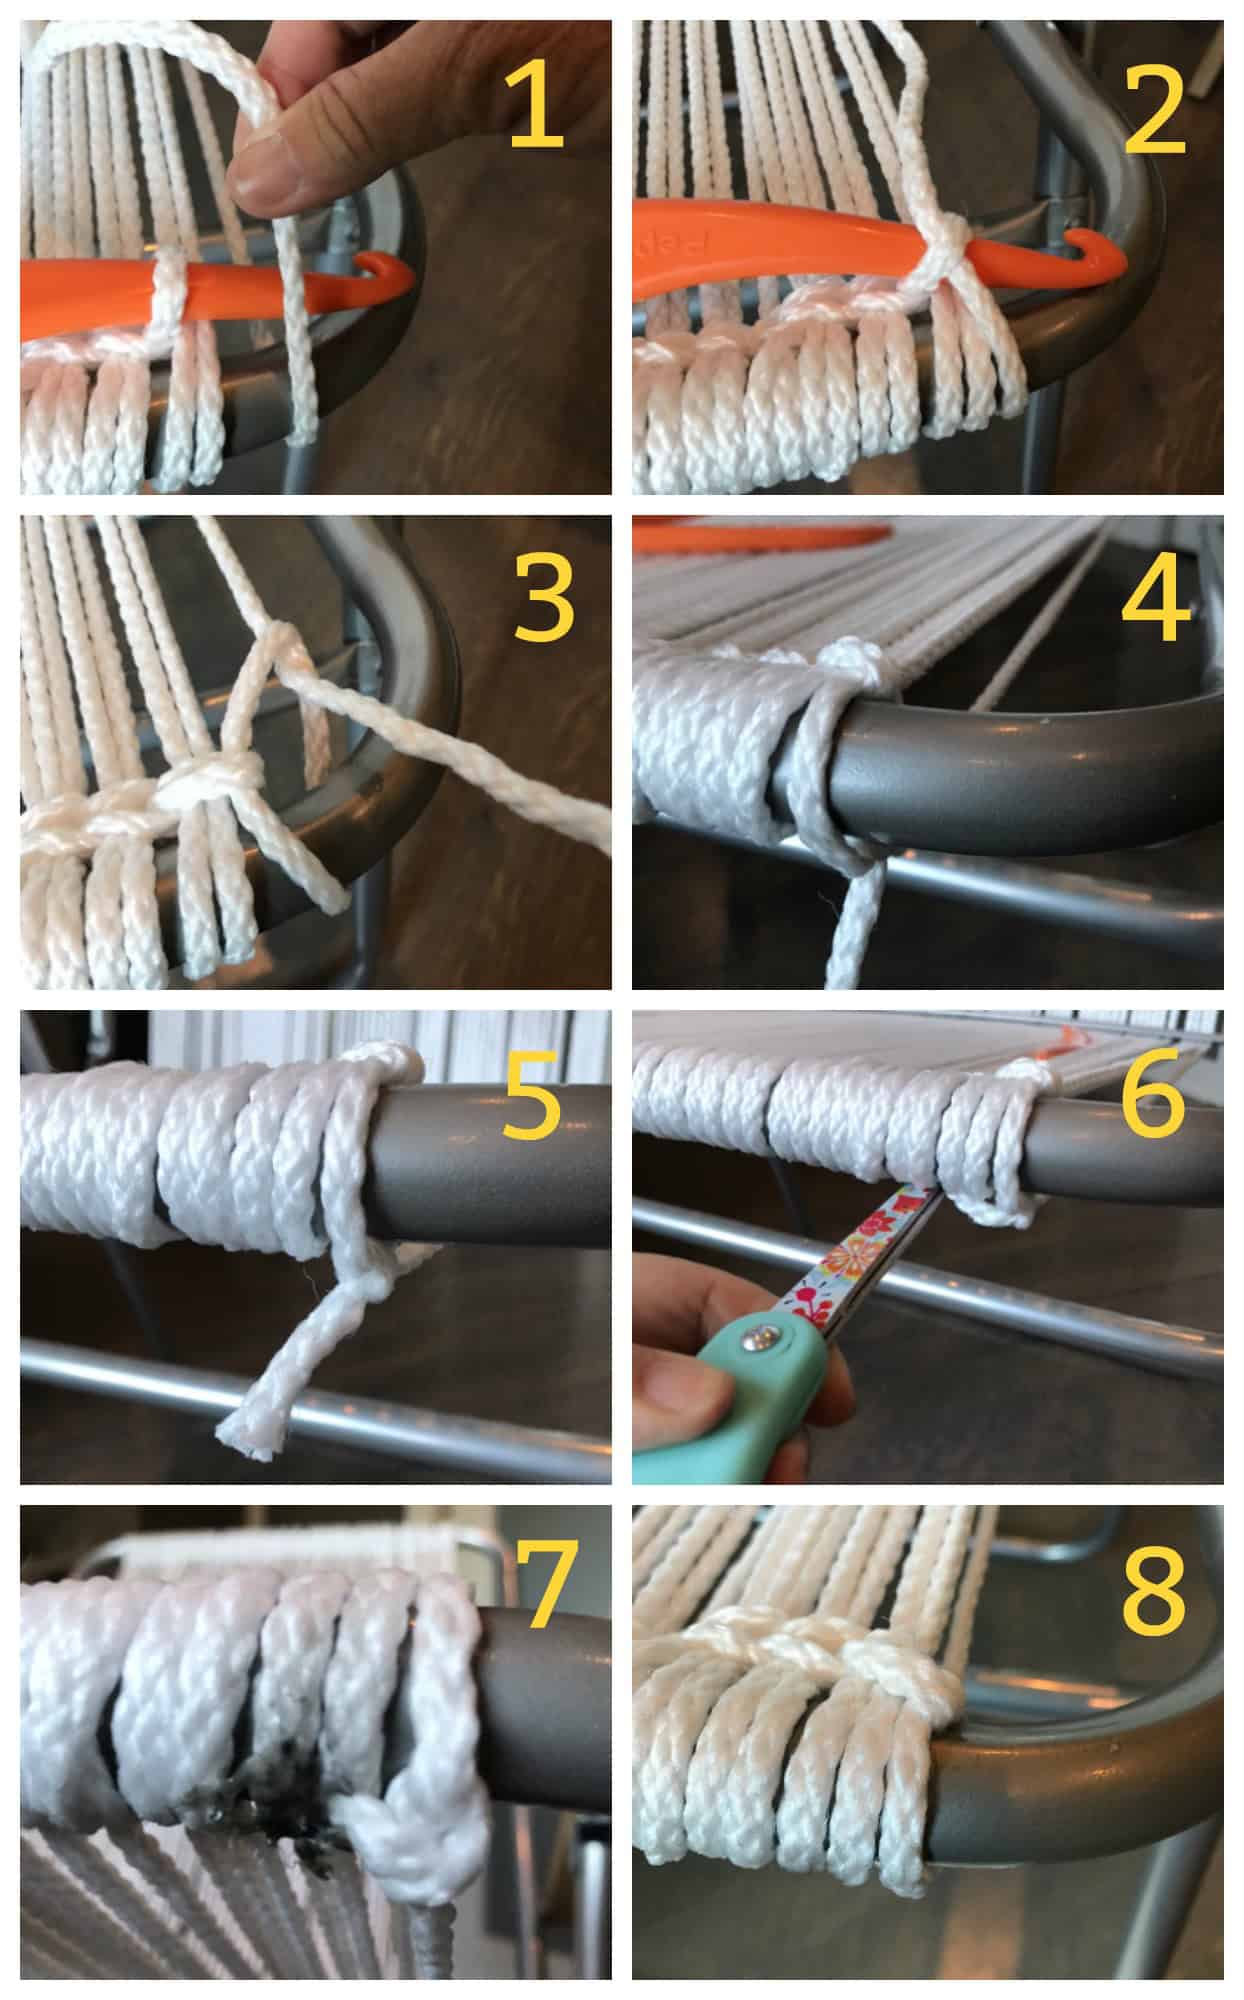
When you’ve made enough vertical weaves to fill the chair and are on your last cord, (1) from the point where I am holding the cord in the photo, measure out another 60 inches and cut the rope. (2) Now switch that cord from OVER the top back bar to UNDER it. Thread the end of the cord through the loop holding the crochet hook. (3) Remove the hook and tighten rope.
Following the photos below, repeat this process for the cording for the bottom. (1) After running the last cord down under the fold bar, pull it UNDER the front bottom bar. (2) Then thread it through the loop holding the crochet hook. (3-4) Tighten rope and make a double knot. (5) Cut the end of the cord short, as shown. (6) Using a lighter or match, light the end of the cord. The heat will cause the polypropylene cording to melt. Using the tip of your scissors, immediately press the melting cord tip to the underside of the bar. (7) This view from underneath the chair shows how the cord will fuse onto the metal. (8) Don’t worry; from the top, the ugly fused end cannot be seen!
**This fusing process is the same method you use to hide all the loose cord ends once all the weaving is finished. Or you can seal the end with a match to prevent fraying, let it cool, then weave the end through the underside cords of the chair.
step 5 – horizontal weave
You will weave from side to side to create the chair bottom, using the same process you did for the vertical weave, using your two crochet hooks to create a chain stitch on the two metal side bars.
step 6 – weaving patterns
As you weave cords horizontally, your pattern or design will depend on which strands of vertical cords you cross over or under.
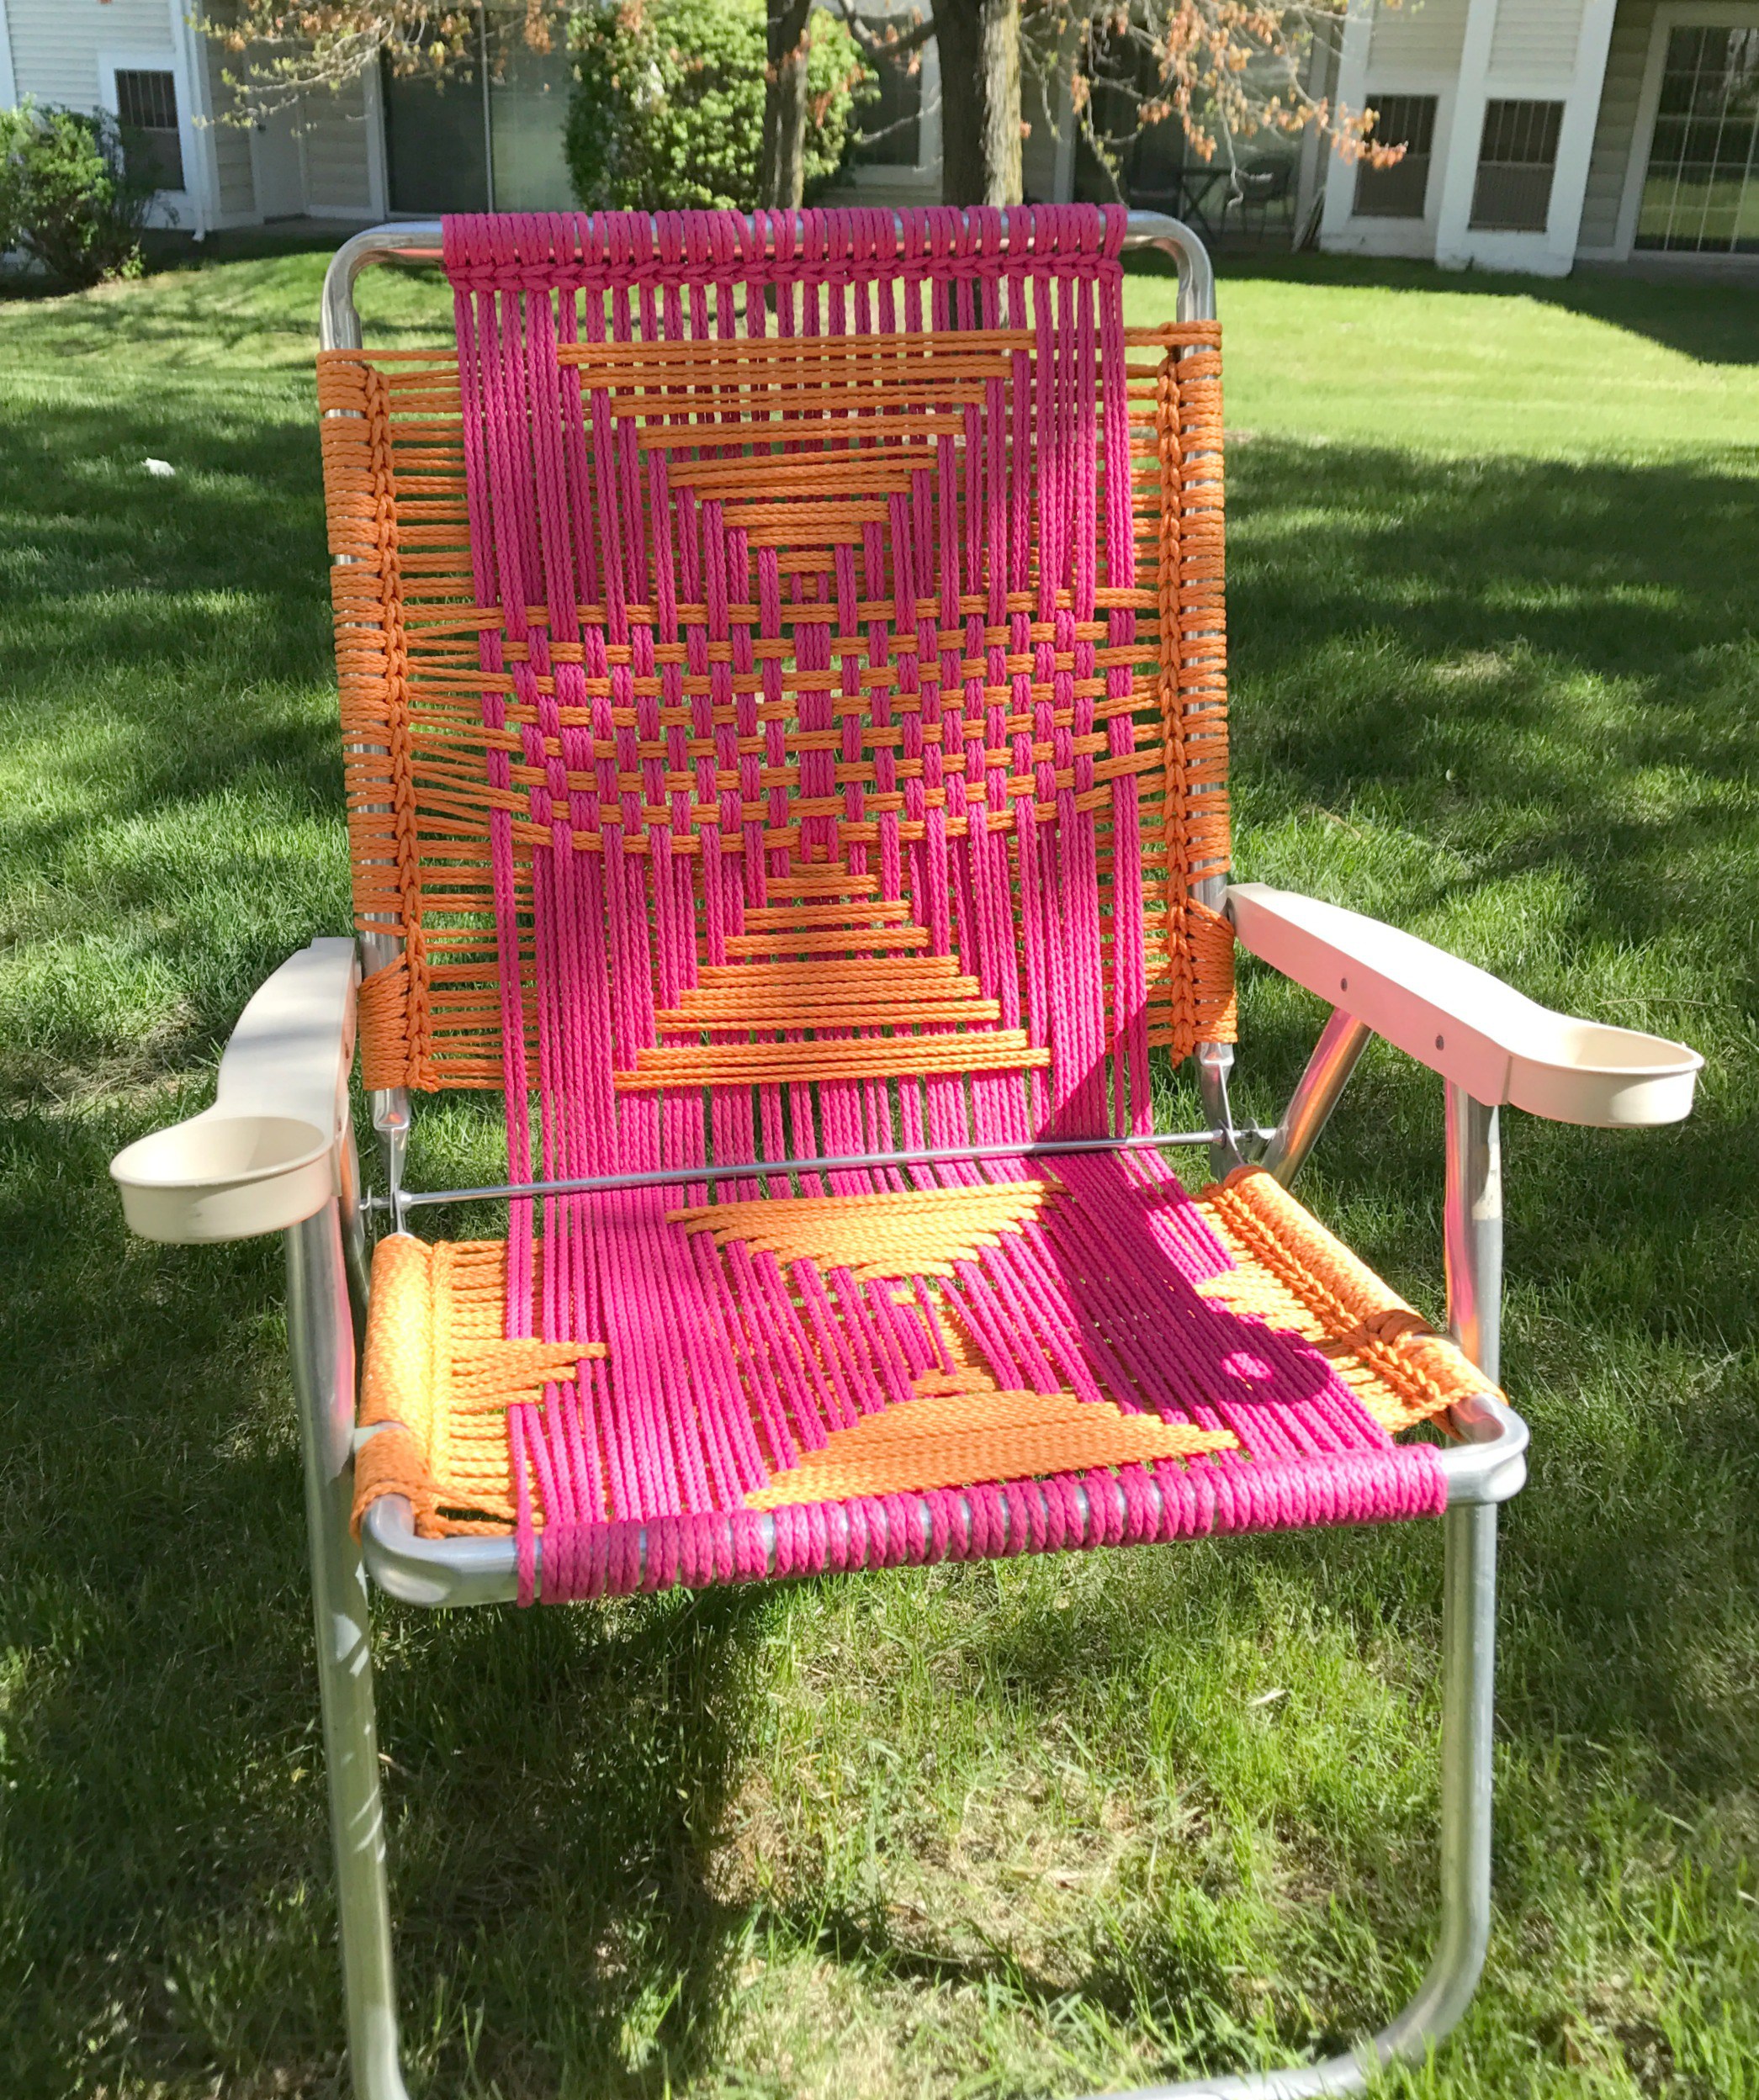
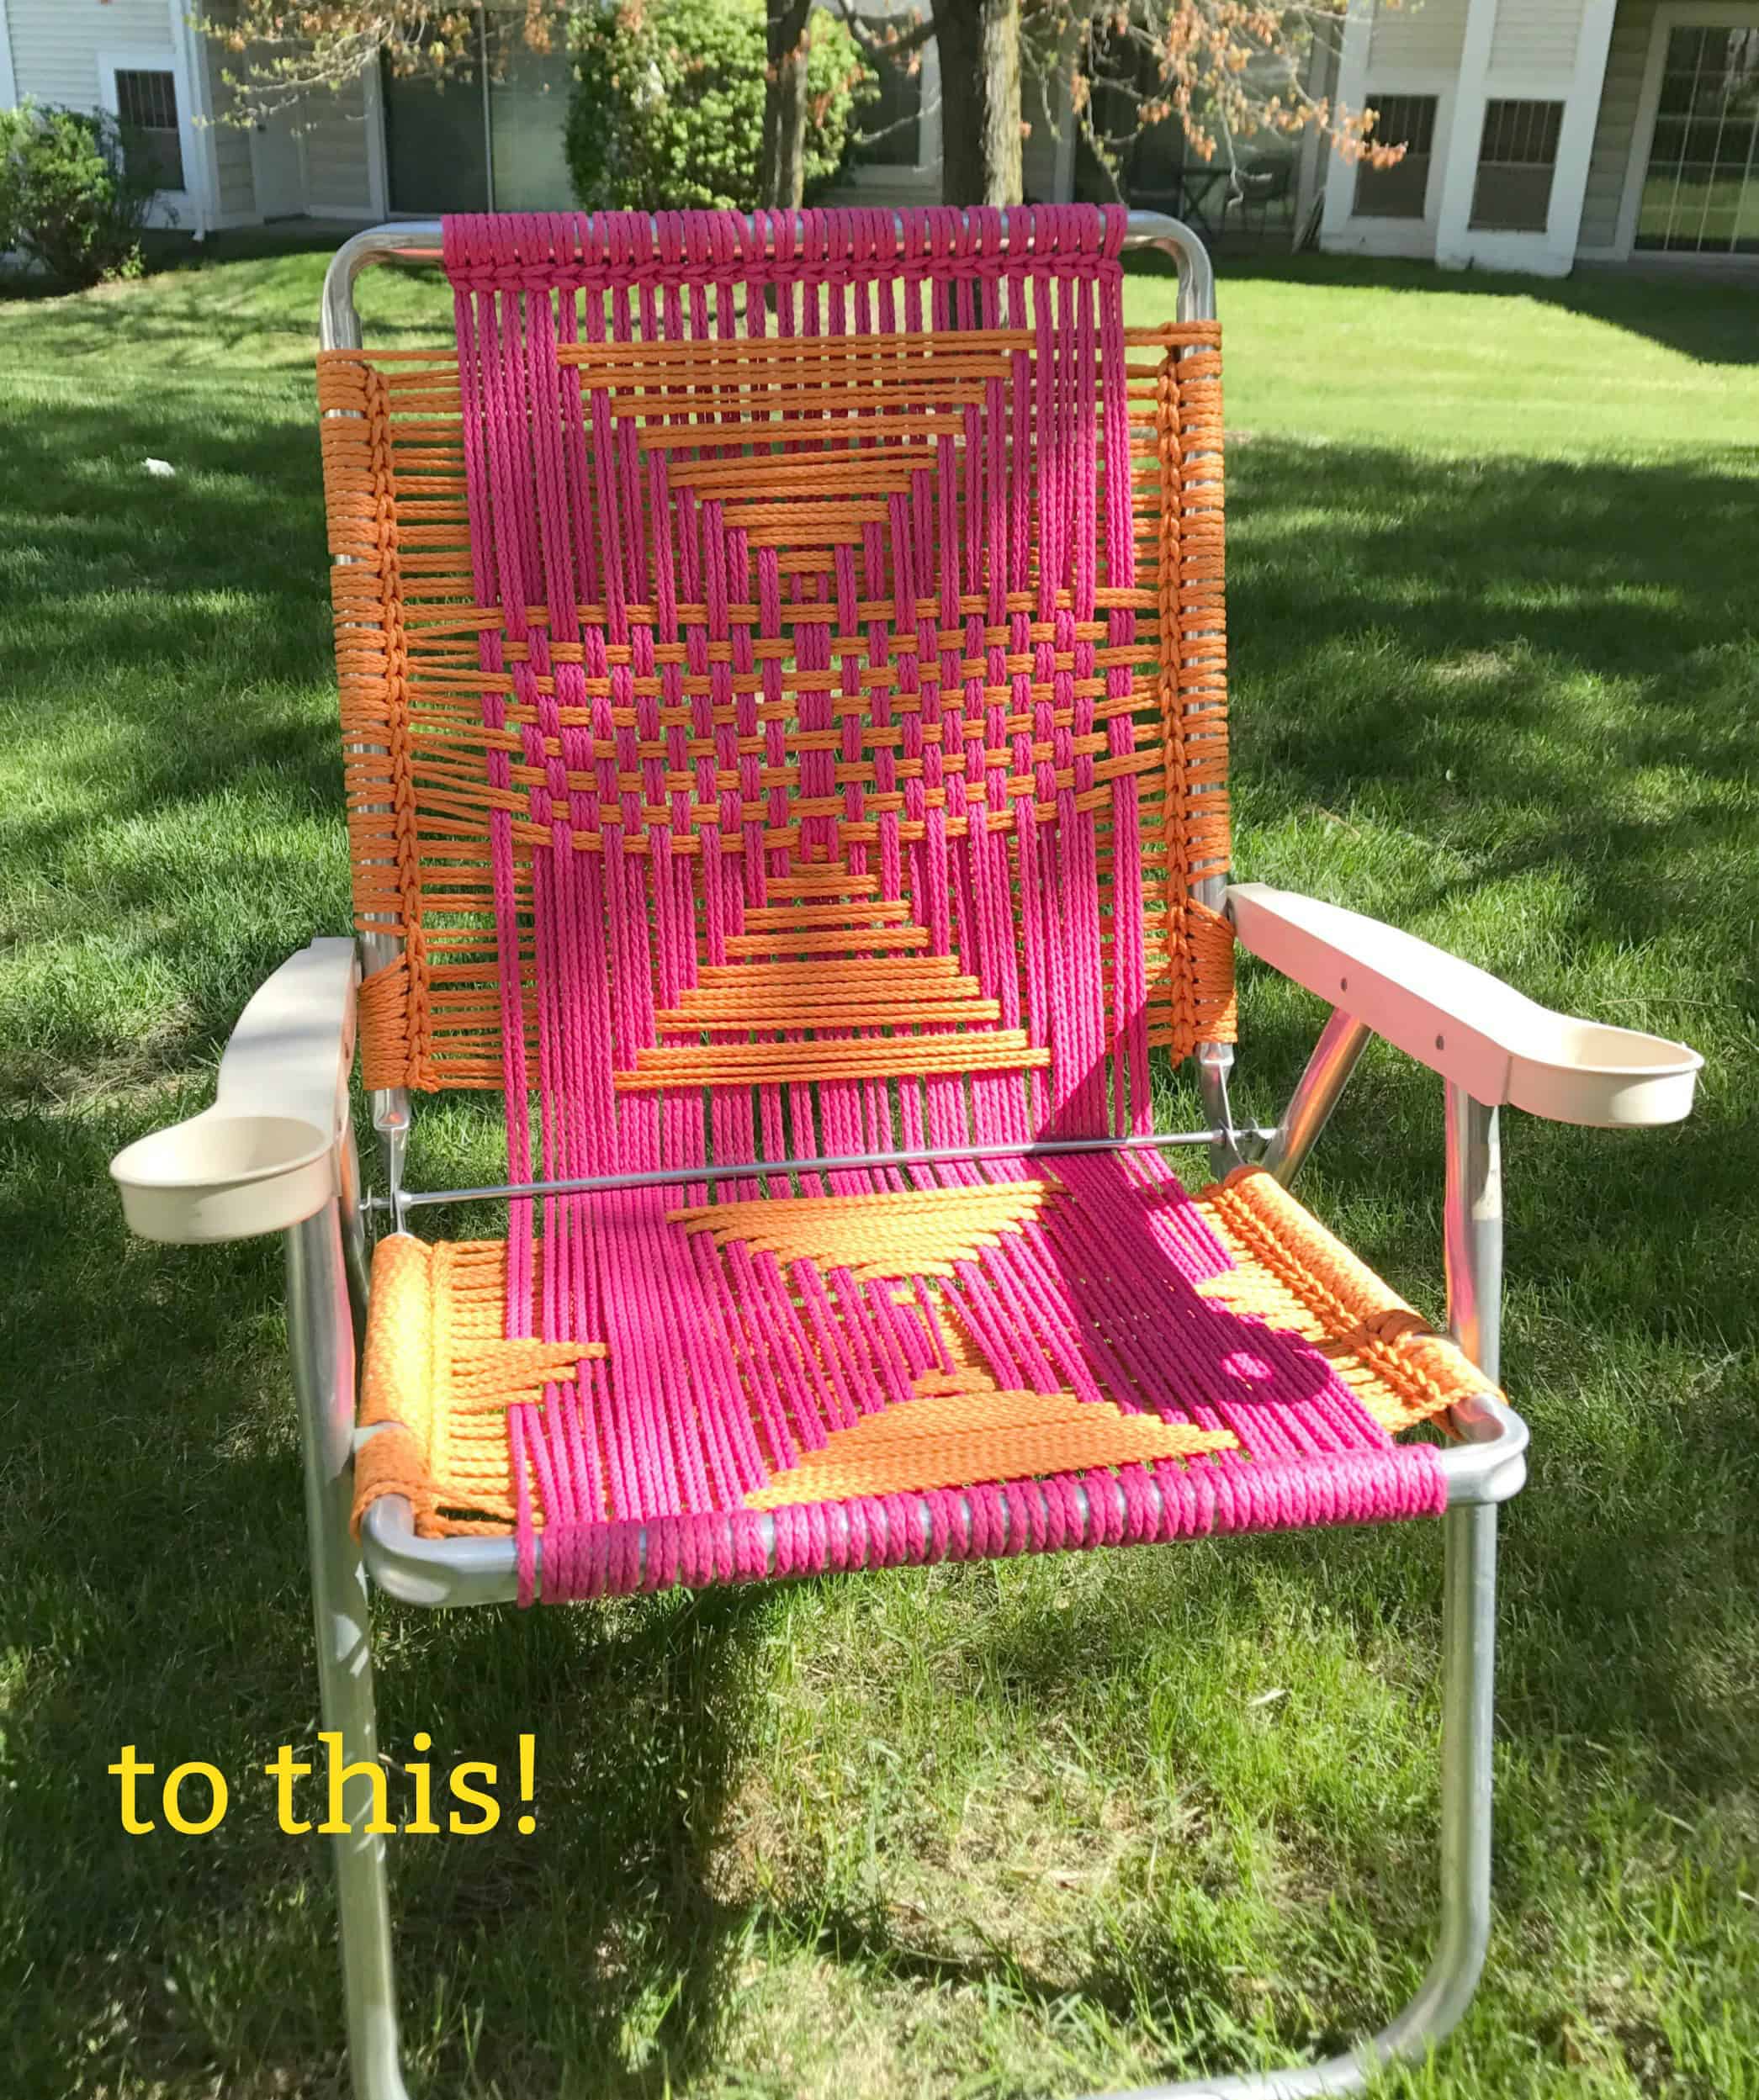
For the pink and orange chair above, I used 100 yards of orange cording and 100 yards of pink. This is the pattern I followed for the chair back:
 And I used this pattern for the chair bottom:
If using only 2 colors, I suggest selecting 2 vivid bright hues to make a fun statement.
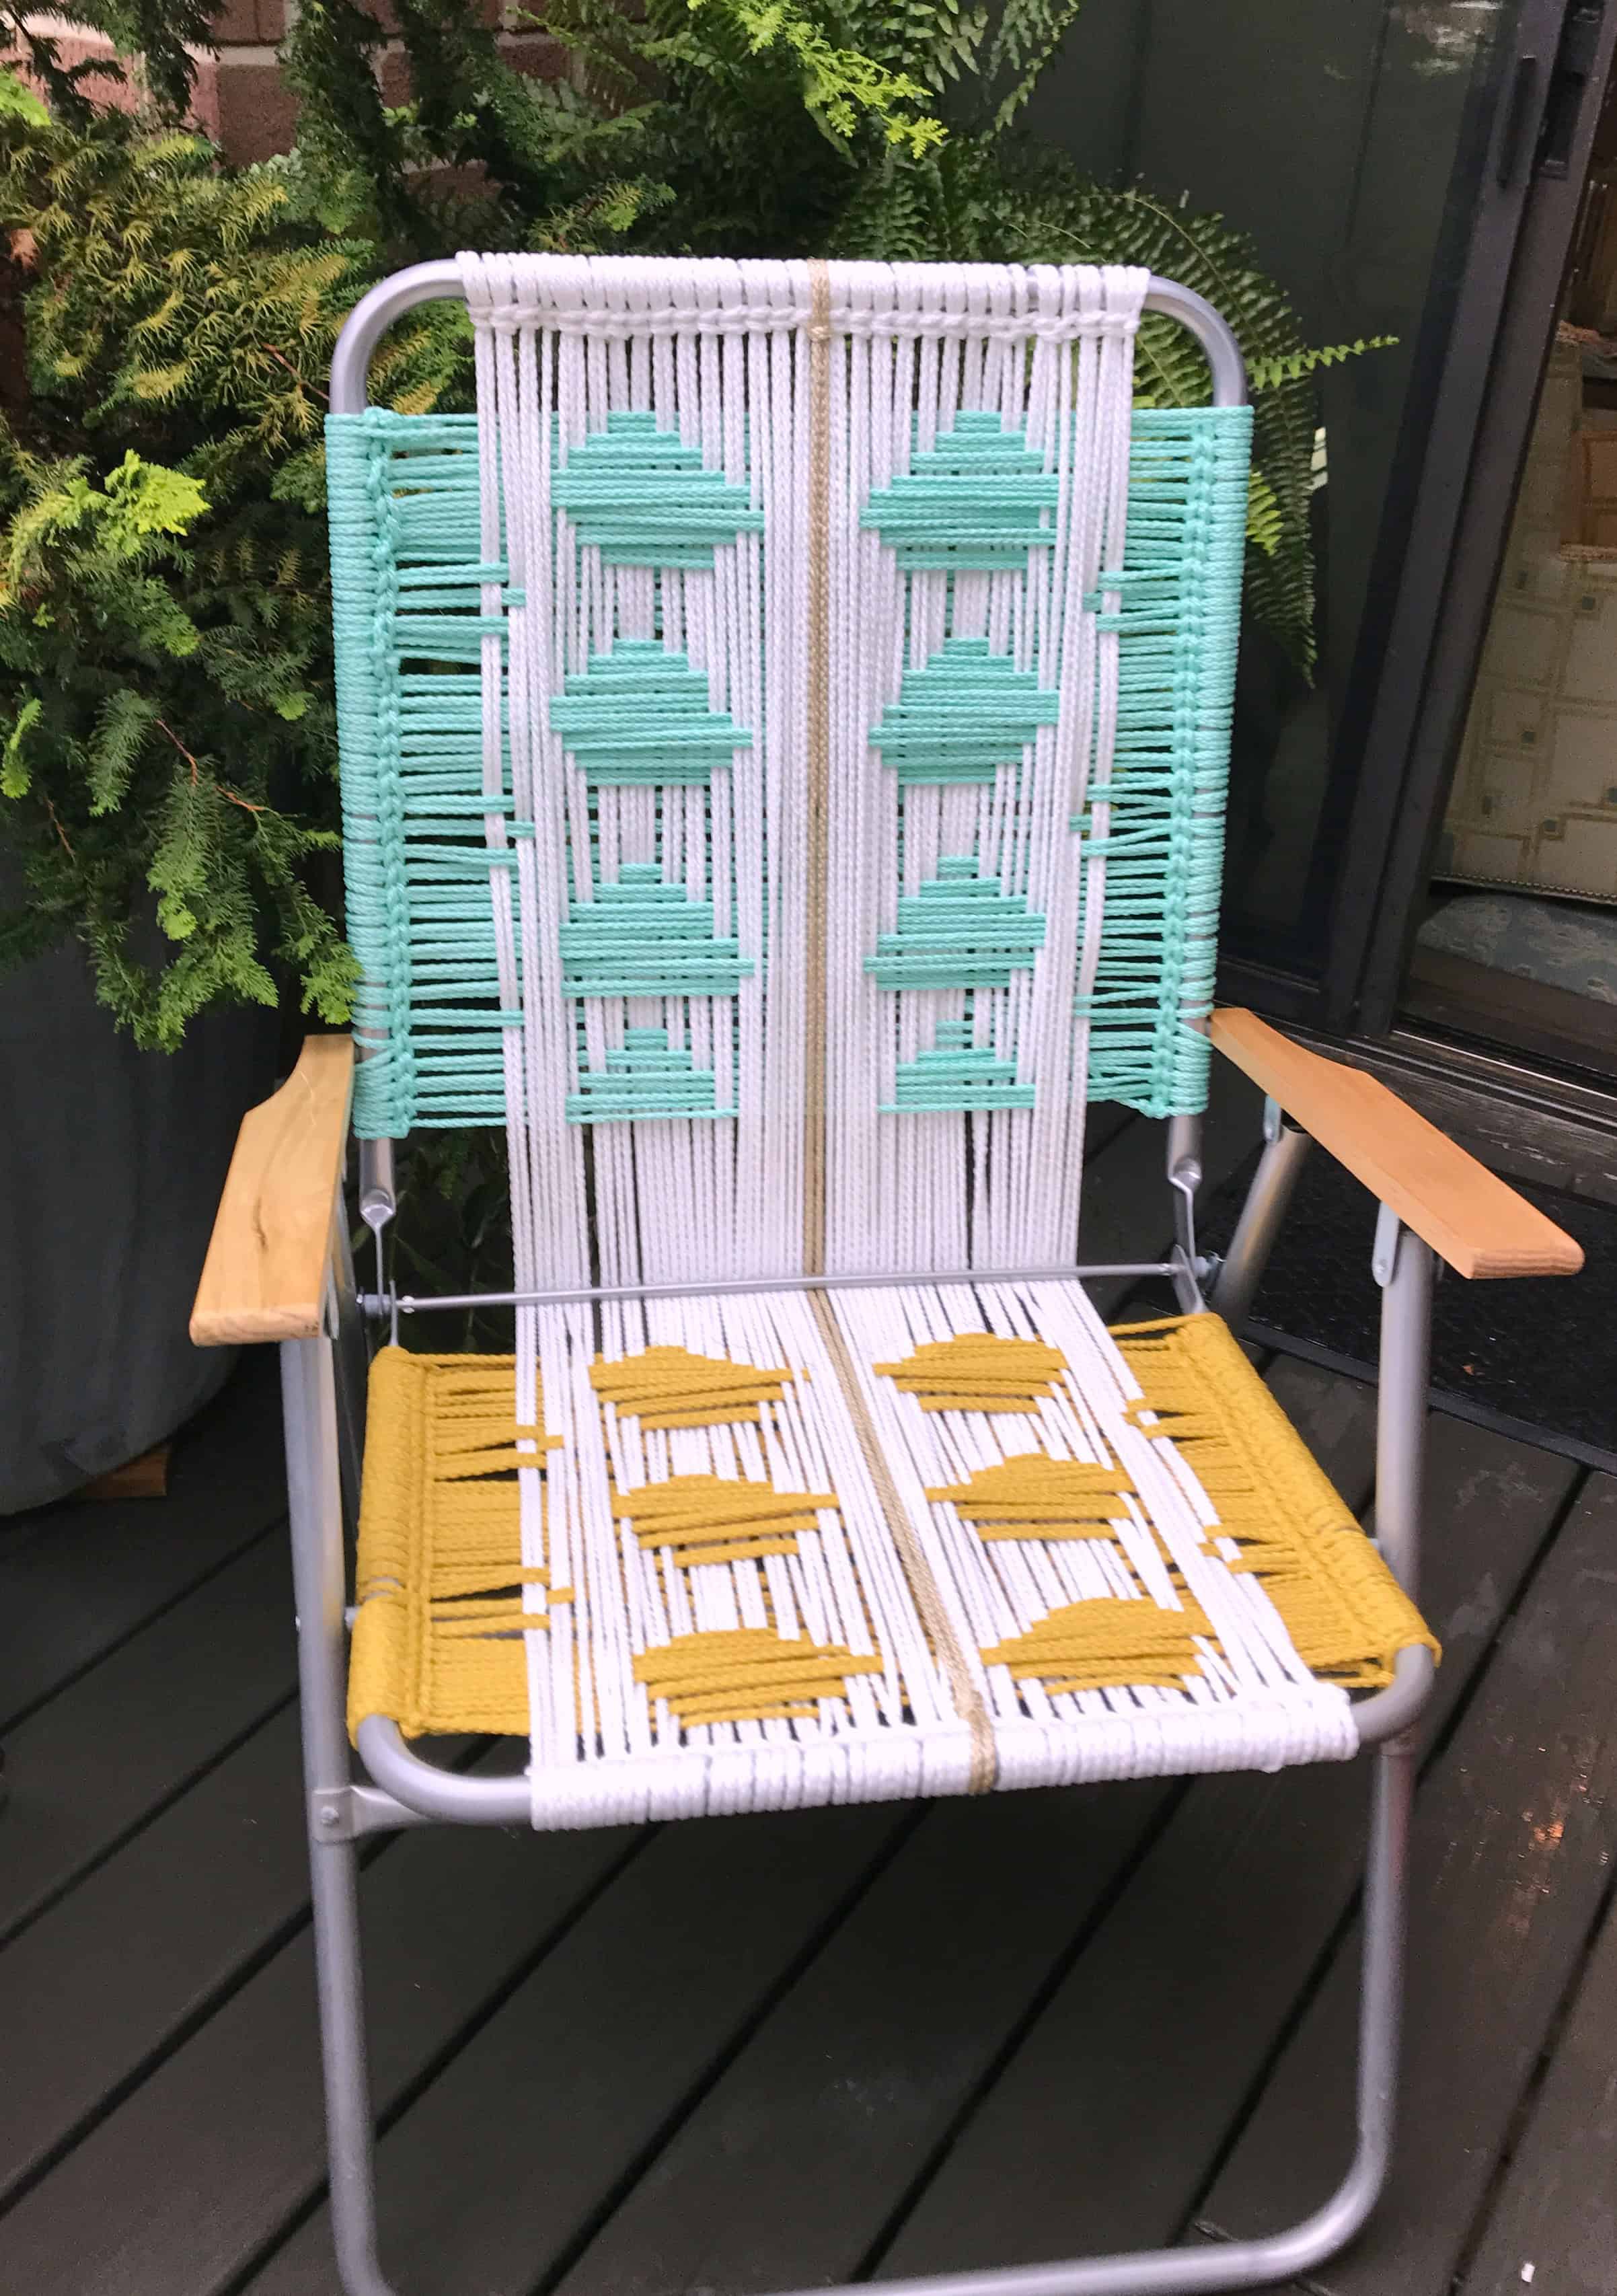
For my second chair (below), I used 100 yards of white cording, 50 yards of aqua, 50 yards of gold, and one long strand for the taupe “stem” down the middle. I tried to weave petals that would emulate Orla Kiely’s iconic motifs.
I do love this chair, especially for my first attempt for this leaf motif. And I’m thrilled with the quality of this chair frame! I’m sure there are much more sophisticated patterns floating around on cyberspace, but like everything, one learns and improves BY DOING. So I followed my heart and made my Orla chair.
Can’t wait to see what kind of designs you’ll come up with!







Love this! Where do you source your wooden arm rests?
The source from which I bought the frame with the wooden arm rests is no longer around. If I run across a new source, I’ll let you know!
This is absolutely amazing! I love it. Pinning to share and save. Visiting from the Love Your Creativity linkup.
Glad you liked it, Jennifer!
Wow, I am impressed! You are so talented. The lawn chair looks lovely. I am happy to feature your Macrame lawn chair at Love Your Creativity. Happy Memorial Day weekend.
Thanks Linda!
Oh Wow! Your chair is gorgeous! You do such lovely work.
Visiting today from SSPS 311 #27,29&31
Thanks so much!
What a fabulous upcycle of an old chair. Thanks for sharing all the details. Yours look amazing!
Glad you enjoyed the post.
Wow! This is amazing and so pretty. What a great way to upcycle these lawn chairs. If I come across any old lawn chairs, I may give this a try.
Glad you liked the post.
Please help me find cording, hook and wondered if there is a website that has “empty” aluminum folding chairs. Years ago I was able to find chairs without webbing… over 20 years ago, though!!
This macrame lawn chair tutorial is fantastic! The step-by-step instructions and accompanying photos make it easy to understand and follow along. The finished product is so beautiful and adds a touch of bohemian style to any outdoor space. I love how the use of different colored cords can add some unique personality to the piece. This tutorial is perfect for those who are looking to try their hand at macrame and add some cozy, handmade charm to their yard or patio. Great job, thank you for sharing!
Fun chair for my old frames , I almost threw out
Hi Cindy, yes, save those old frames. This really transforms them!
Love this! Have just arranged to pick up some 2nd hand chairs!! Could you tell me how many mm the cord is please? Thanks
sorry ignore me, I’ve re read your instructions!!
No worries! Good luck with the project!
I provide https://kidstrust.org as a service to my parents customers. Please assume from the following reviews if you start use of my site. Not later than using this project, you send me a happy hour 😉
This is the perfect website for anyone who hopes to find
out about this topic. You know a whole lot its almost tough to argue with you (not that I personally will
need to?HaHa). You certainly put a fresh spin on a
subject that has been discussed for a long time. Excellent stuff,
just great!. Feel free to visit my goods best cord electric lawn mowers agreenhand
Absolutely gorgeous. Can’t decide which one I like best they are all amazing. Thank you so much for sharing.
Thank you!
Wow, this chair is so cool! I love the hot pink and the orange combo. You really are on a roll with your fantastic macrame projects. Keep it up I can’t wait to see what you come up with next.
Thanks !
I love your new blog header! Pretty!